Mac で Neovim を Python の開発環境にする。
目標
作業が完了すると Neovim は、次の 3 つの動作をするようになります。

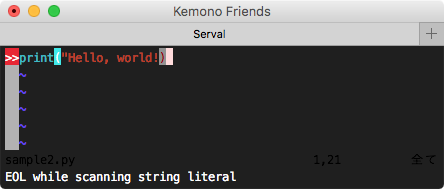
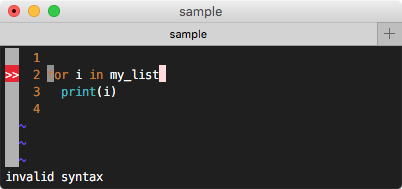
1. 構文チェック Syntastic, pyflakes

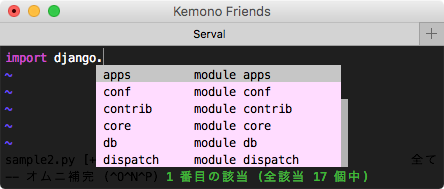
2. 補完 jedi-vim(ドット . を押下した時に補完)

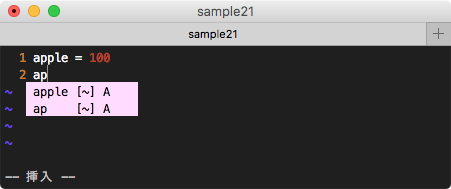
3. 補完 deoplete-nvim(変数名を補完)
| 項番 | 名前 | 説明 |
|---|---|---|
| 1 | Homebrew | macOS のパッケージマネージャ |
| 2 | Python3 | Python3 |
| 3 | pyflakes | 構文チェッカ |
| 4 | pycodestyle | 規約チェッカ |
| 5 | pydocstyle | ドキュメント規約チェッカ |
| 6 | virtualenvwrapper | venv ツール |
| 7 | Neovim | Vim の後継 |
| 8 | dein.vim | Vimプラグイン プラグインマネジャ |
| 9 | syntastic | Vim プラグイン 構文チェッカ |
| 10 | Neovim* | Python client to Neovim |
| 11 | vim-virtualenv | Vim プラグイン パス修正 |
| 12 | jedi-vim | Vim プラグイン 補完 |
| 13 | deoplete.nvim | Neovim プラグイン 補完 |
| 14 | deoplete-jedi | Neovim プラグイン 補完 |
1. Homebrew
macOS のパッケージ管理システムです。
Step1.
$ ruby -e "$(curl -fsSL https://raw.githubusercontent.com/Homebrew/install/master/install)"
◯ 解説
Homebrew は、パッケージ管理システムです。パッケージ管理システムは、ソフトウェアのインストールするときに使います。
実は Mac には他にも MacPorts というパッケージ管理システムもあります。MacPorts は最近あまり見なくなってので Homebrew を採用しています。
- 他のパッケージ管理システムとの違いは?
Homebrew と MacPorts の違いが表になっていてわかりやすいです。 - MacPortsからHomebrewに乗り換えた
2. Python3
Step1.
$ brew install python3
◯ Homebrew でのインストールの解説
$ # バージョンの確認
$ python --version
Python 2.7.10
$
$ # パスの確認
$ which python
/usr/bin/python
$
$ # バージョン3をインストールする場合
$ brew install python3
$
$ # パスの確認
$ which python3
/usr/local/bin/python3
$
$ # Homebrew では
$ # /usr/local/bin/ 配下に
$ # インストールしたものが
$ # 格納されます
$
$ # path が /usr/bin/python から /usr/local/bin/python3 に
$ # 変わっていますね。
$ #
$ # Homebrew は
$ # /usr/local/bin/ 配下にパッケージをインストールします。
$ # /usr/local/bin/ にはユーザが保存したコマンドが保存されます。
$ #
$ # 一方...
$ # /usr/bin/ にはデフォルトではいっているコマンドが格納されます。
$ # なので OS をアップデートすると一緒にアップデートされたりします。
$ #
$ # http://dqn.sakusakutto.jp/2011/08/linux_usrlocal.html
$
$
$ #
$ # バージョン2をインストールする場合
$ # についても見てみましょう。
$ sudo brew install python
$
$ # パスの確認
$ which python
/usr/local/bin/python
$
$ # なお /usr/bin/python は、削除されていません。
$ # なので full path を指定すると OS 標準の python が起動します。
$ /usr/bin/python
Python 2.7.10 (default, Oct 23 2015, 18:05:06)
[GCC 4.2.1 Compatible Apple LLVM 7.0.0 (clang-700.0.59.5)] on darwin
Type "help", "copyright", "credits" or "license" for more information.
>>>
◯ 解説(蛇足)
少なくとも 2020 年ごろまでは brew install python をしても Python 2 がインストールされる様です。
当面の間は、全てのディストリビューションは python は、同じターゲットとして python2 を参照しなければいけない。
for the time being, all distributions should ensure that python refers to the same target as python2.
PEP 394 -- The "python" Command on Unix-Like Systems
この勧告(PEP 394)が python のシンボリックリンクが python2 よりも python3 を指すことを提案する様に更新されるほど、この Python 3 を囲むサードパーティ製のエコシステムが、成熟する時がいずれは来ることを、期待しています。
It is anticipated that there will eventually come a time where the third party ecosystem surrounding Python 3 is sufficiently mature for this recommendation to be updated to suggest that the python symlink refer to python3 rather than python2.この提案は次の 2, 3 年にわたって定期的に見直され、コアの開発チームが適切だとみなしたときに更新します。評価基準として、Python 2.7 に対する通常の保守リリース(regular maintenance releases)は、少なくとも 2020 年まで継続されます。
This recommendation will be periodically reviewed over the next few years, and updated when the core development team judges it appropriate. As a point of reference, regular maintenance releases for the Python 2.7 series will continue until at least 2020.
PEP 394 -- The "python" Command on Unix-Like Systems
なんでこんな話をしているかと言うと brew 界隈ではちょっとした混乱がありました。
brew install python を実行すると Python 3 がインストールされる様に変更されましたが、その直後に brew install python を実行すると Python 2 がインストールされる様に戻りました。Homebrew のチームが、ちょっと先走ってしまったかららしいのですが、それを止める根拠になったのがこの PEP だったので紹介しました。
先日 Homebrew のパッケージの改変が行われ、python という Formula は Python3 をインストールするようになり、 /usr/local/bin/python もpython3へのリンクになっていました。
これがまた変更され、 /usr/local/bin/python は python2 へのリンクに戻されました。
Homebrewでインストールされる/usr/local/bin/pythonが再びPython2に変更
3. pyflakes
コードが SyntaxError を起こさないか調べてくれます。
Step1.
$ pip3 install pyflakes
4. pycodestyle
コードが PEP 8 に沿っているか調べてくれます。PEP 8 はコーディング規約を定めています。
Step1. インストール
$ pip3 install pycodesytle
Step2. 設定ファイル
無視したいワーニングを設定します。
$ nvim ~/.config/pycodestyle
configuration - pycodestyle’s documentation
以下は自分が使っている設定です。
[pycodestyle]
ignore =
    # W503 line break before binary operator
    W503
◯ なぜ W503 を無視したか。
PEP 8 の内容と異なるからです。いちおう pycodestyle は公式のツールなので、なぜこのように PEP 8 と反する規約をチェックするのか謎です。誰も直さないだけなのでしょうか。以下は、PEP 8 からの抜粋です。
For decades the recommended style was to break after binary operators.
十数年にわたり推奨されたコーディングスタイルは、二項演算子の後に改行を入れることでした。But this can hurt readability in two ways: the operators tend to get scattered across different columns on the screen, and each operator is moved away from its operand and onto the previous line.
しかし、これは次の2つから可読性を損ないます。演算子がスクリーン上の異なる列に散らばります、またここの演算子はオペランド(訳注: 簡単に言えば "変数" のこと)から引き離され1つ上の行に来ます。Here, the eye has to do extra work to tell which items are added and which are subtracted:
すると目は、どの要素が加算され、そして減算されているかを教えるという余計な仕事を行わなければなりません。
# No: operators sit far away from their operands
income = (gross_wages +
          taxable_interest +
          (dividends - qualified_dividends) -
          ira_deduction -
          student_loan_interest)
To solve this readability problem, mathematicians and their publishers follow the opposite convention.
この可読性の問題を解くために、数学者と彼らの出版社は反対の慣習に従います。Donald Knuth explains the traditional rule in his Computers and Typesetting series: "Although formulas within a paragraph always break after binary operations and relations, displayed formulas always break before binary operations" (Donald Knuth's The TeXBook, pages 195 and 196)
Donald Knuth は、コピュータと植字のシリーズで伝統的なルールを説明しています。「段落内の式は、いつも二項演算とそれに関連するものの後に改行します。一方で、展示された式は、いつも二項演算の前に改行します。」
(訳注: 正直、よくわかりません。間違ってるかもしれませんが、意訳するなら「文章中に現れた式を改行する際は、いつも行末に二項演算子を書いてから改行し、オペランドを行頭に書きます。一方で、中央揃えにして図と同じような扱いで表示された式 (displayed formulas) を改行する際は、オペランドを書いてから改行し、行頭に二項演算子を書きます。」)」Following the tradition from mathematics usually results in more readable code:
数学者の慣習に従うと、通常はより読みやすいコードになります。
# Yes: easy to match operators with operands
income = (gross_wages
          + taxable_interest
          + (dividends - qualified_dividends)
          - ira_deduction
          - student_loan_interest)
In Python code, it is permissible to break before or after a binary operator, as long as the convention is consistent locally. For new code Knuth's style is suggested.
Python のコードでは、既に書かれたコードについては、コーディングスタイルの一貫性が保たれる範囲の中で、二項演算子の前または後ろでどちらで改行しても構いません。新しいコードを書くときは Kunuth のスタイルが望ましいです。Should a line break before or after a binary operator? | PEP 8
◯ E501 line too long について
「1行の長さが 79 文字を超えています。」と言うワーニングです。これが結構、厳しい規約で遵守するのが難しかったりします。
その制約を守るための方法をいくつか記載しました。
Python PEP 8 の最大 79 文字について
5. pydocstyle
コードが PEP257 に沿っているか調べてくれます。PEP257 はドキュメントの書き方を定めています、
Step1.
$ pip3 install pydocsytle
Step2. 設定ファイル
無視したいワーニングを設定します。
(~/.config/pydocstyle なら良かったのに...)
$ nvim ~/.pydocstyle
Configuration Files - pydocstyle’s documentation
[pydocstyle]
ignore =
    # D100: Missing docstring in public module
    D100,
    # D101: Missing docstring in public class
    D101,
    # D102: Missing docstring in public method.
    D102,
    # D103: Missing docstring in public function
    D103,
    # D104: Missing docstring in public package
    D104,
    # D105: Missing docstring in magic method
    D105,
    # D107: Missing docstring in __init__
    D107,
    # D203: 1 blank line required before class docstring (found 0)
    D203,
◯ なぜ D100 ~ D103, D105, D107 を無視したか。
すべてのクラスや関数、メソッドに docstring を書くのはさすがに煩雑すぎるから。書くときは従うけど、書かなくてもいいように。
◯ なぜ D203 を無視したか。
D203 と D211 の規約は矛盾しているから(そんなの作らないでよ..)
Are D203 and D211 in conflict?
(解説) pip って何?
pip は、パッケージ管理システムです。Python で書かれたパッケージソフトウェアをインストール・管理するためのパッケージ管理システムです。
Homebrew は、Mac で使うためのソフトウェアを扱うパッケージ管理システムです。区別しましょう。
多くの pip でインストールできるパッケージは、Python Package Index (PyPI) 上にあります。
(解説) PEP って何?
PEP(Python Enhancement Proposal) は、文字通り Python の機能拡充のための提案です。PEP 8, PEP 256 のような規約であったり、PEP0484 TypeHints などの様々な議論, 提案がなされます。以下、一部抜粋したものを示します。
PEP 0: PEP の一覧
PEP 0 -- Index of Python Enhancement Proposals (PEPs)
PEP 1: PEP って何?
What is a PEP? | PEP 1 -- PEP Purpose and Guidelines
PEP stands for Python Enhancement Proposal.
PEP は Python Enhancement Proposal (Python 拡充提案)を意味しています。A PEP is a design document providing information to the Python community, or describing a new feature for Python or its processes or environment.
PEP は設計書です。この設計書は Python コミュニティに情報を提供したり、Python の新しい機能、手続き、または環境を説明したりするものです。The PEP should provide a concise technical specification of the feature and a rationale for the feature.
PEP は、機能に関する簡潔な技術仕様と、その機能の動作原理を伝えなければなりません。We intend PEPs to be the primary mechanisms for proposing major new features, for collecting community input on an issue, and for documenting the design decisions that have gone into Python.
PEP が主要な仕組みとなることを意図しています。どのような仕組みかと言えば、大きな新しい機能の提案をするため、議案に対してコミュニティに提供された情報を取り纏めるため、Python に取り入れられた設計に関する決定を文書にするための物です。The PEP author is responsible for building consensus within the community and documenting dissenting opinions.
PEP の起草者は、コミュニティ内でコンセンサスを確立することと、反対意見を文書化することに責任を持ちます。Because the PEPs are maintained as text files in a versioned repository, their revision history is the historical record of the feature proposal [1].
PEP はバージョン管理されたリポジトリでテキストファイルとして保存されるため、これらの改訂履歴は過去になされた機能提案 PEP の変更履歴のレコードとなります。[1]。[1] This historical record is available by the normal git commands for retrieving older revisions, and can also be browsed via HTTP here: https://github.com/python/peps
変更履歴のレコードは、古いバージョンを取得するための通常の git コマンドを使えば閲覧できます。また https://github.com/python/peps からHTTP 経由でも、閲覧することができます。
◯ references
- Python: pep8 は pycodestyle になったし pep257 は pydocstyle になった
- pep8 が pycodestyle に変わった話
- Pythonの ... 各種Lint・解析ツール5種まとめ!
(作業)venv で仮想環境の構築
venv は、pip でインストールしたモジュールをアプリケーションごとに切り替えて使いたいときに使います。
28.3. venv — 仮想環境の作成
いま、あなたは version 1 の LibFoo を必要とするアプリケーションを持っていて、一方で別のアプリケーションでは version 2 が必要な状況を考えて見てください。どうやって2つのアプリケーションを使いますか?もし全てを /usr/lib/python2.7/site-packages (あるいは、あなたのプラットフォームの標準場所がなんであろうとも) にインストールした場合、アップグレードしてはいけないアプリケーションを意図せずアップグレードしてしまうような状況に簡単に陥ってしまうでしょう。
Imagine you have an application that needs version 1 of LibFoo, but another application requires version 2. How can you use both these applications? If you install everything into /usr/lib/python2.7/site-packages (or whatever your platform’s standard location is), it’s easy to end up in a situation where you unintentionally upgrade an application that shouldn’t be upgraded.
virtualenv 15.1.0 : Python Package Index | PyPI
このページに来られたワイのような初心者の方は、アプリケーションを複数作るようなこともないので、venv は、あまり必要ないかもしれません。
私の環境に合わせることになってしまいますが、いましばしお付き合いください。
自分も切り替えるような必要もなかったのですが heroku に趣味で1つだけ作ったアプリをあげるときに必要だったので、止む無くインストールしました。
Step1. 仮想環境を保存するディレクトリを作成します。
$ mkdir ~/.virtualenvs
~/.virtualenvs と言うファイルパスは、virtualenvwrapper のマニュアルに準拠 しました。
Step2. 仮想環境を作成
$ # python3 -m venv ~/.virtualenvs/仮想環境名
$ python3 -m venv ~/.virtualenvs/my_venv_name
Step3. 仮想環境を有効にします。
$ # 仮想環境を有効にします。
$ source .virtualenvs/my_env_name/bin/activate
(my_venv_name) $
(my_venv_name) $ #仮想環境を無効にします。
(my_venv_name) $ deactivate
$
「source」コマンドは、ファイルに書かれたコマンドを現在のシェルで実行する、 というコマンドです。主にシェルの設定ファイルを反映させる際に使用します。
... 中略 ...
「bash ファイル」(またはファイル名のみを入力してシェルスクリプト)を実行した場合と、 sourceコマンドを用いた場合は、何が違うのでしょうか... 以下略
◯ venv の歴史
venv はもともと virtualenv と呼ばれていたツールが、正式に採用されたものです。PEP 405 に経緯等が書かれています。いまでも pip install virtualenv とするとインストールすることができます。機能的には、ほぼ同じです。また古い記事で virtualenv と書かれているものも venv に読み替えて適用することができます。
PEP 405 -- Python Virtual Environments
◯ そのほかのツール
pyenv, pipenv Poerty など色々ツールがあるのですが、正直、どう言うものかあまりわかっていません。
7. virtualenvwrapper
仮想環境を有効にするためにその都度 source するのは面倒なので、
ショートカットコマンド workon というコマンドを作ってくれます。
virtualenvwrapper
Step1.
$ pip3 install virtualenvwrapper
Step2.
~/.bashrc に、以下の3行を追記する。
$ nvim ~/.bashrc
export VIRTUALENVWRAPPER_PYTHON=/usr/local/bin/python3
export WORKON_HOME=$HOME/.virtualenvs
source /usr/local/bin/virtualenvwrapper.sh
Step3.
$ # 設定を有効にする。
$ source ~/.bashrc
◯ virtualenvwrapper を使った仮想環境の作り方
$ workon my_venv_name
(my_venv_name)$
--python オプション は、使用するインタプリタを指定します。
その後ろの py3env は環境名を指定しています。
/Users/ユーザ名/.virtualenvs/py3env というディレクトリが新しく作成されます。
(my_venv_name)$ deactivate
$
$ mkvirtualenv --python=python3 py3env
(py3env)$
(py3env)$ deactivate
$
$ mkvirtualenv --python=python  py2env
(py2env)$ deactivate
$
$ # 環境の一覧の表示
$ workon
my_venv_name
py2env
py3env
◯ workon すると同時に cd したい
/Users/ユーザ名/.virtualenvs/py3env/bin/postactivate というファイルを作り workon 時に実行したいスクリプトを書くことができます。 これを利用して workon と同時に移動したいディレクトリを指定できます。
#!/bin/sh

cd 移動したいディレクトリ
postactivate - Per-User Customization
The local \$VIRTUAL_ENV/bin/postactivate script is sourced after the new environment is enabled. \$VIRTUAL_ENV refers to the new environment at the time the script runs.
7. Neovim
Vim の後継みたいなもの。歴史的には Vi > Vim > Neovim みたいな流れですかね。他にも editor だと atom とかもありますけどね.. Neovim なのか、どうなのか.. あとデザインもなんだかなって感じです。
もともと自分はインラフ系のエンジニアだったので、そういった環境だと最初からはいってる vim を使うことが多かったのと、あと atom はまだまだ重いと言う話を聞いたので atom ではなく Neovim に移行しました。
Step1.
$ brew install neovim
Step2. ファイル作成
nvim の設定ファイルを作りましょう。vim では ~/.vimrc ですが nvim では ~/.config/neovim/init.vim
$ mkdir ~/.config/nvim
$ touch ~/.config/nvim/init.vim
全ての作業が 完了したら 次のようなものが出来上がると想定しています。
とりあえず先に全体像だけお見せします。
"
" ユーザ名 は各自の mac のユーザ名で置き換えてください。
"

" nvim プラグインのインストール
set runtimepath+=/Users/ユーザ名/.cache/dein/repos/github.com/Shougo/dein.vim

if dein#load_state('/Users/ユーザ名/.cache/dein')
  call dein#begin('/Users/ユーザ名/.cache/dein')
  call dein#add('/Users/ユーザ名/.cache/dein/repos/github.com/Shougo/dein.vim')
  call dein#add('scrooloose/syntastic')
  call dein#add('davidhalter/jedi-vim')
  call dein#add('Shougo/deoplete.nvim')
  call dein#add('zchee/deoplete-jedi')
  call dein#end()
  call dein#save_state()
endif

" nvim プラグインの設定
let g:syntastic_python_checkers = ['pycodestyle',  'pyflakes', ]
let g:jedi#force_py_version = 3
let g:deoplete#enable_at_startup = 1

" nvim 本体の設定
set backspace=indent,eol,start
set mouse=a
set clipboard&
set clipboard^=unnamedplus
Step3. マウスホイールを有効に
マウスホーイルによるスクールを有効にします。init.vim に次の1行を加えます。
" set オプション = 値
" set mouse    = a
set mouse=a
この作業で cmd + c, cmd + p によるコピペが使えなくなります。
- Copying text outside of Vim with set mouse=a enabled
- Copy-paste for vim is not working when mouse (:set mouse=a) is on?
Step4. コピペができるように
マウスで範囲を選択して y でコピー, d で切り取りを行います。
マウスで選択したタイミングで visual mode に切り替わります。
set clipboard+=unnamedplus
| key | do |
|---|---|
| y | コピー |
| p | ペースト |
| d | 切り取り |
◯ 検討していること
cmd + d に y を割り当てられないか、試して見たがダメでした。
" これはダメだった... orz
vnoremap <D-c> y
- keymap: Support <D-...> (super/command key). #4317
- 【図解Vim】mapとnoremap
- Vim でコピペするときの Tips
- Neovim や Vim でコピペする方法
- How can I have cmd + c work in neovim in iTerm on macOS
◯ ヘルプの抜粋
あまり help の使い方も register の概念もわかっていない...
:help set
:se[t] {option}+={value}              *:set+=*
            Add the {value} to a number option, or append the
            {value} to a string option.  When the option is a
            comma separated list, a comma is added, unless the
            value was empty.
            If the option is a list of flags, superfluous flags
            are removed.  When adding a flag that was already
            present the option value doesn't change.
            Also see |:set-args| above.
:help clipboard
Clipboard integration                  *provider-clipboard* *clipboard*

Nvim has no direct connection to the system clipboard. Instead it depends on
a |provider| which transparently uses shell commands to communicate with the
system clipboard or any other clipboard "backend".

To ALWAYS use the clipboard for ALL operations (instead of interacting with
the '+' and/or '*' registers explicitly): >
    set clipboard+=unnamedplus

See 'clipboard' for details and options.
:help 'clipboard'
'clipboard' 'cb' string  (default "")
            global
    This option is a list of comma separated names.
    These names are recognized:

                        *clipboard-unnamedplus*
    unnamedplus A variant of the "unnamed" flag which uses the
            clipboard register '+' (|quoteplus|) instead of
            register '*' for all yank, delete, change and put
            operations which would normally go to the unnamed
            register.  When "unnamed" is also included to the
            option, yank and delete operations (but not put)
            will additionally copy the text into register
            '*'. See |clipboard|.
8. dein.vim
init.vim に GitHub の URL を書くだけで vim プラグインがインストールできるようになる。 例えば..
  " https://github.com/jmcantrell/vim-virtualenv から
  " ダウンロード&インストール
  call dein#add('jmcantrell/vim-virtualenv')
Step1. インストーラーの実行
$ curl https://raw.githubusercontent.com/Shougo/dein.vim/master/bin/installer.sh > installer.sh
$ sh ./installer.sh ~/.cache/dein
Step2. 設定ファイルの編集
$ nvim ~/.config/nvim/init.vim
「ユーザ名」は自分の macOS のユーザ名を入力してください。
set mouse=a
set clipboard+=unnamedplus

if &compatible
  set nocompatible
endif
set runtimepath+=/Users/ユーザ名/.cache/dein/repos/github.com/Shougo/dein.vim

if dein#load_state('/Users/ユーザ名/.cache/dein')
  call dein#begin('/Users/ユーザ名/.cache/dein')

  call dein#add('/Users/ユーザ名/.cache/dein/repos/github.com/Shougo/dein.vim')
  call dein#end()
  call dein#save_state()
endif
filetype plugin indent on
syntax enable
大量によくわからないものを書き込むとよくわからない。
runtimepath は nvim の実行時のパスらしい。
:help runtimepath
調査中
# は autoload と呼ばれるものらしい。
:help autoload
                         *autoload* *E746*
This is introduced in the user manual, section |41.15|.

Using a script in the "autoload" directory is simpler, but requires using
exactly the right file name.  A function that can be autoloaded has a name
like this: >

    :call filename#funcname()
Step3. 動作確認
nvim のコマンドモードで次の1行を入力してください。
:call dein#install()
インストールするべきものが見つからないよ。って帰ってきたら成功です。
[dein] Target plugins are not found.
[dein] You may have used the wrong plugin name, or all of the plugins are already installed.
:call dein#install() を実行すると、
プラグインをインストールしてくれるみたいです。
:help dein#install
                         *dein#install()*
dein#install([{plugins}])
        Install the plugins asynchronously.
        {plugins} is the plugins name list.
        If you omit it, dein will install all plugins.
9. Syntastic
Syntastic は Vim の構文チェックプラグインです。構文チェック自体は pyflakes, pycodestyle, pydocstyle が行います。Syntastic は nvim と pyflakes, pycodestyle, pydocstyle の橋渡しを行います。
Step1. init.vim に次の2行を追記
  call dein#add('scrooloose/syntastic')
let g:syntastic_python_checkers = ['pydocstyle', 'pycodestyle', 'pyflakes']
場所はこの辺に..
" syntastic のインストール
if dein#load_state('/Users/ユーザ名/.cache/dein')
  call dein#begin('/Users/ユーザ名/.cache/dein')
  ...
  call dein#add('scrooloose/syntastic')
  ...
  call dein#end()
  call dein#save_state()
endif

" syntastic に pyflakes を指定
" g => Global, l => Local
" 代入 スコープ  : 変数名                     = 値
" let g        : syntastic_python_checkers = ['pydocstyle', 'pycodestyle', 'pyflakes']
let g:syntastic_python_checkers = ['pydocstyle', 'pycodestyle', 'pyflakes']
set で代入するときは Neovim への設定、
let のときはプラグインへの設定になっています。
ここで注意して欲しいのは ['pydocstyle', 'pycodestyle', 'pyflakes'] の順番を守らないとちゃんと動作しません。 * 変数のスコープ — 名無しのvim使い
Step2. Syntastic のインストール
追記が終わったら以下のコマンドを vim のノーマルモードで入力する。
:call dein#install()
Step3. 動作確認
間違った構文を入力して、syntax error を指摘してくれるかを確認してみましょう。保存 :w したタイミングでチェックをかけてくれます。

◯ Django の template ファイルの構文解析
Django を使っている場合の話になりますが Syntastic をいれたあとに Django の template ファイルを修正よしようとすると、正しいにもかかわらず色々警告してくれます。これは Django の template ファイルの形式が、通常の html ファイルとは書式が若干異なるからです。そのため ~/init.vim に次の文言を追加すると、そう言った警告を出さなくなります。
" html 拡張子がついてたら Django の templateとして
" 読み込んでね、という設定
autocmd FileType html setl filetype=htmldjango
あるいは都度 vim のノーマルモードで :setfiletype htmldjango とすることでも、それを解消できます。
- django.vim : Syntax highlighting for Django templates
- vimでDjangoのテンプレートを開いたときに色を付ける方法
- Vim Django template syntax checker | Google Group
10. neovim (neovim の python3 クライアント)
neovim の Python3 クライアントです。なにかは良くわからない。でも無いと補完が効かない。
neovim/pynvim
Pynvim implements support for python plugins in Nvim. It also works as a library for connecting to and scripting Nvim processes through its msgpack-rpc API.
msgpack-rpc/msgpack-rpc
Extremely efficient object serialization library. It's like JSON, but very fast and small.
Step1.
$ # 仮想環境を有効にする
$ workon my_venv_name
(my_venv_name) $ # インスール
(my_venv_name) $ pip3 install neovim
◯ これをインストールしないと、どうなるか。
これをしないと jedi-vim をインストールしても、ちゃんと読み込んでくれません。 あるいはエラーがでなかったとしても、補完が効かない可能性があります。 neovim の python3 インターフェイスが有効じゃなくても使えたら良かったのに.. pyfalkes みたいに。
"sample.py" 1201L, 39552C
jedi-vim: the detected Python version (2) is not functional. Is the "neovim" module installed? While jedi-vim will work, it might not use the expected Python path.
function jedi#init_python の処理中にエラーが検出されました:
行    7:
Error: jedi-vim failed to initialize Python: jedi-vim requires Vim with support for Python 2 or 3. (in function jedi#init_python[3]..<SNR>43_init_python, line 52)
jedi-vim: the detected Python version (2) is not functional. Is the "neovim" module installed? While jedi-vim will work, it might not use the expected Python path.
Error: jedi-vim failed to initialize Python: jedi-vim requires Vim with support for Python 2 or 3. (in function jedi#init_python[3]..<SNR>43_init_python, line 52)
続けるにはENTERを押すかコマンドを入力してください
◯ あれ pyflakes, pycodestyle, pydocstyle は仮想環境でインストールしてなくね?
問題ありません。
neovim(neovimのPython3クライアント) と、pyflakes, pycodestyle, pydocstyle はインストール先が若干異なります。(後日追記)
11. vim-virtualenv
neovim の Python クライアントに virtualenv へのパスを通します。
Step1. 現設定の確認
$ # 仮想環境にはいり nvim を起動。
$ workon my_venv_name
(my_venv_name) $  nvim
nvim のノーマルモードで以下のコードを実行。
:python3 for path in sys.path: print(path)
virtualenv へのパスがはいっていません。
/usr/local/Cellar/python3/3.6.3/Frameworks/Python.framework/Versions/3.6/lib/python36.zip
/usr/local/Cellar/python3/3.6.3/Frameworks/Python.framework/Versions/3.6/lib/python3.6
/usr/local/Cellar/python3/3.6.3/Frameworks/Python.framework/Versions/3.6/lib/python3.6/lib-dynload
/usr/local/lib/python3.6/site-packages
_vim_path_
Step2. インストール
追記して
call dein#add('jmcantrell/vim-virtualenv')
インストール
:call dein#install()
Step3. 設定の確認
仮想環境を有効な状態から nvim を起動して
(my_venv_name) $ nvim
Python を実行
:python3 for path in sys.path: print(path)
パスが追加されました。
/Users/ユーザ名/.virtualenvs/my_venv_name/lib/python35.zip
/Users/ユーザ名/.virtualenvs/my_venv_name/lib/python3.5
/Users/ユーザ名/.virtualenvs/my_venv_name/lib/python3.5/plat-darwin
/Users/ユーザ名/.virtualenvs/my_venv_name/lib/python3.5/lib-dynload
/Users/ユーザ名/.virtualenvs/my_venv_name/python3.5/site-packages
/usr/local/Cellar/python3/3.5.2_3/Frameworks/Python.framework/Versions/3.5/lib/python3.5
/usr/local/Cellar/python3/3.5.2_3/Frameworks/Python.framework/Versions/3.5/lib/python3.5/plat-darwin
/usr/local/lib/python3.6/site-packages
_vim_path_
12. jedi-vim
次の2行を追記して
  call dein#add('davidhalter/jedi-vim')

" Python2 のインターフェイスが有効じゃないよと都度警告を出してくれるので
" それを無効に
let g:jedi#force_py_version = 3
インストール
:call dein#install()
13. deoplete.nvim
Neovim は ctrl + p でも補完してくれます。このモジュールをいれると、変数名を入れると途中で自動的に補完してくるようにします。

次の2行を追記して
  call dein#add('Shougo/deoplete.nvim')


" Use deoplete.
let g:deoplete#enable_at_startup = 1
インストール
:call dein#install()
14. deoplete-jedi
13 の続きになります。Python の構文に対応してないので、それをインストールします。
追記して
call dein#add('zchee/deoplete-jedi')
インストール
:call dein#install()
おわりに
勢いで書き上げました。取っ掛かりづらいところが多々あるかと思います。どうかご容赦ください。
Vim の操作 - 基本編
Interactive Vim tutorial
Vim の操作 - 応用編
本当に助かりました、ありがとうございます。
怠け者エンジニアは vim をマスターしましょう その1 - 基本と移動
怠け者エンジニアは vim をマスターしましょう その2 - 編集
Vim の操作 - 精神編
新人達を1ヶ月でガチ vimmer にした方法
Vim スクリプト - 基礎編
Vimスクリプト基礎文法最速マスター
Vim スクリプト - 実践編
いつか読みたい...
Vim エディターのスクリプトの作成
あとターミナルのタブ名を自動的にファイル名に変更するスクリプトです。
Mac で vi を開くとき Terminal のタブ名を filename にする。